Silhouette Print & Cut Tutorial
tutorial with free silhouette print and cut files


Mix and Match the Bands and Frills
to Make Four Different Thank You Cards
Finally a way to get small text in one or more fonts, printed in one or more colors, placed perfectly within almost any shape of any color that can be used as an embellishment!

There have been many articles written about how to draw an image using the Silhouette software and how to cut that image on a Silhouette cutting machine. There have also been many blog posts written about how to import an image into the Silhouette software and how to cut that image.
Basically, the Silhouette software allows you to place registration marks on the paper which gets printed, and then the Silhouette cutting machine recognizes these registration marks so that it knows where to cut. It's all about the registration marks — they're key.
Silhouette Designer Edition software and Sure Cuts A Lot are packed with many useful features, and they can be used to do many nice things. I just don't want to use them to design my layouts. For me, SCAL and Silhouette Studio are just the way I tell my Silhouette Cameo to start cutting.
I want to prepare my designs in Adobe Illustrator, import them into Silhouette Studio or Sure Cuts A Lot, and then make my cuts.
I figured that all I'd have to do to make this happen would be to incorporate the Silhouette registration marks directly onto the files which I create in Illustrator and later send to the printer. The Silhouette machine doesn't care where the registration marks came from — it just wants them to be there.
The project I'm posting today was more or less an experiment in doing things my way — designing in Illustrator, including the all important registration marks on the Illustrator files that get printed, and then cutting with the Silhouette.
I designed a basic card shape with scalloped edge and made four different color bands with the words "thank you" printed in various ways. I also made a scalloped circular embellishment in four different colors. There are 3 PDF files, 3 SVG files and 3 STUDIO files included in this set: a print file and a cut file for the card base, a print file and a cut file for the color bands and a print file and a cut file for the scalloped embellishment.
You can print out one copy of all 3 files and then mix and match the pieces before assembling and gluing to make one card, or you can print out 4 copies of the base card and one copy of the other files and use all of the pieces to make 4 cards.
The first thing you'll want to do is to open all of the PDF printing files and send them to your favorite printer. The files do not have to be opened from the Silhouette Studio software or the SCAL software to be printed. You can open them and print them from whatever software you normally use to print PDF files (I usually use Adobe Acrobat).
The next steps vary depending upon whether you are using the Silhouette Studio Designer Edition software or Sure Cuts A Lot software. Sure Cuts A Lot Tutoral starts below. Silhouette Studio Tutorial appears further down this page.
Silhouette Print & Cut – Sure Cuts A Lot Tutorial
 | |
|
thank-you-base-print.pdf (on left) thank-you-base-cut.svg (on right) | |
| 1. | Take the black and white base card print and place it onto the Silhouette cutting mat with the top left edge aligned with the top left edge of the grid on the cutting mat. This print does not have registration marks, because I didn't feel that they were necessary. Open the SCAL software, click on the Import SVG button, and import the "thank-you-base-cut.svg" file. Place the SVG about 1" from the left edge of the virtual cutting mat and 1/2" from the top. Load the cutting mat into the Silhouette cutting machine and cut the file by clicking on the Cut button. |
 | |
thank-you-bands-print.pdf (on left) thank-you-bands-cut.svg (on right) | |
| 2. | After you've cut the base card, take the "thank-you-bands" image that you printed, and place it onto the Silhouette cutting mat with the top left edge aligned with the top left edge of the grid on the cutting mat. Load the mat into your Silhouette Cameo |
| 3. | Open your Sure Cuts A Lot software, click on the Import SVG, and open the "thank-you-bands-cut.svg" file. |
| 4. | Place the file so that the corner of the white box at the upper left edge of the file image is aligned with the upper left edge of the grid on the virtual cutting mat. |
| 5. | Choose Cutter > Cut with Silhouette CAMEO from the top SCAL menu and the Silhouette Cut Settings menu will appear on your screen. |
 |
|
| 6. | Click on the box in the lower left corner which reads "Print and Cut." The Silhouette Print and Cut menu will appear. |
 |
|
| When using the SCAL Print & Cut feature for the first time, it will probably be necessary for you to do a test cut and calibrate the cut settings in your Sure Cuts A Lot software by following the instructions provided in the window which appears when you click on "Calibrate" from the SCAL Silhouette Cut Settings window. | |
 | |
| 7. | Click on the "Detect Marks" button which appears on the lower right corner of this menu. |
 |
|
| 8. | The Silhouette Cameo will begin scanning the image to detect the registration marks. When scanning is complete, a "Cut" button will appear next to the "Detect Marks" button. Click the "Cut" button and the Silhouette will cut your paper. |
 | |
| thank-you-frills-print.pdf (on left) thank-you-frills-cut.svg (on right) | |
| 9. | Repeat the steps above using the thank-you-frills.pdf" and the "thank-you-frills.svg" files. |
| 10. | Score the black and white base card at 5-1/2 inches from the white top edge and fold so that about 1 inch of the white inner card is showing below the scalloped edge. Choose the band you'd like to use and glue it to the face of the card over the solid black area. Choose the colored frill you'd like to use and glue it over the circular area of the band. |
Silhouette Print & Cut – Silhouette Studio Tutorial
 | |
| thank-you-base-print.pdf (on left) thank-you-base-cut.studio (on right) | |
| 1. | Take the black and white base card print and place it onto the Silhouette cutting mat with the top left edge aligned with the top left edge of the grid on the cutting mat. This print does not have registration marks (I didn't feel that they were necessary). Open the Silhouette Studio Designer software, choose File > Open, and open the "thank-you-base-cut.studio" file. Load the cutting mat into the Silhouette cutting machine and cut the file by choosing File > Send to Silhouette. |
 |
|
| 2. | After you've cut the base card, take the "thank-you-bands" image that you printed, and place it onto the Silhouette cutting mat with the top left edge aligned with the top left edge of the grid on the cutting mat. Set the mat aside. |
 | |
| thank-you-bands-print.pdf (on left) thank-you-bands-cut.studio (on right) |
|
| 3. | Open the Silhouette Studio Designer software, choose File > Open, and open the "thank-you-bands-cut.studio" file. |
| 4. | Choose File > Registration Mark Settings and the Registration Marks menu will appear on the right side of the screen. |
 |
|
| 5. | Make sure that the box which reads "Show Reg Marks" is checked (this step is very important). |
 |
|
| If you are doing this with your own imported image, the software will place another set of registration marks on the screen. You should just ignore this duplicate set of marks. They won't have any effect on what you'll do next. | |
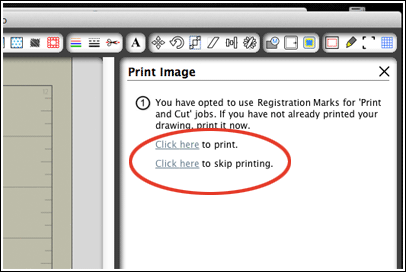
| 6. | Next, choose File > Send to Silhouette. A dialogue will appear asking you if you want to print the job or if you want to skip the printing step. You want to skip printing. |
 |
|
| 7. | Follow the instructions for loading your cutting mat into the Silhouette and click "Continue." |
| 8. | Next, you will be asked if you want to detect registration marks before cutting. Choose "Detect automatically." Your Silhouette will detect the registration marks and, when successful, the software will display a message telling you that the detection was successful. |
| 9. | Click the Cut button and the Silhouette will cut your paper. |
 | |
thank-you-frills-print.pdf (on left) thank-you-frills-cut.studio (on right) |
|
| 10. | Repeat the steps above using the thank-you-frills.pdf" and the "thank-you-frills.studio" files. |
| 11. | Score the black and white base card at 5-1/2 inches from the white top edge and fold so that about 1 inch of the white inner card is showing below the scalloped edge. Choose the band you'd like to use and glue it to the face of the card over the solid black area. Choose the colored frill you'd like to use and glue it over the circular area of the band. |


