Silhouette Trace & Detach Tutorial
free svg files


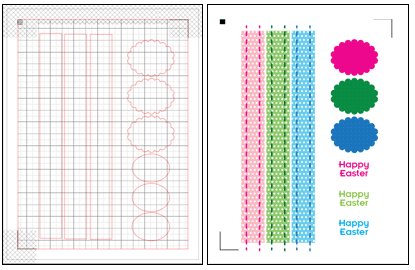

Use the images found on the free Easter cartoon file along with the Easter embellishment print and cut files to make many different Easter cards
The Easter cartoon files I'm using for this tutorial can be found and downloaded for free at https://vectorgraphicsblog.com/free-vector-graphics/easter-cartoon-vector-clipart/. You can also find the file on my Pinterest Free Clip Art board. The Easter card embellishments print and cut files can be downloaded below (at the end of the tutorial).

The Easter cartoons are supplied in 3 formats: Adobe Illustrator (.ai), Encapsulated Postscript (.eps) and Scalable Vector Graphic (.svg). For anyone who has the Adobe Illustrator program, it is very easy to open the .ai file and copy any of the individual images for use in Silhouette Studio. Fortunately, for those of you who don't want to (or can't afford to) spend $599 to buy Adobe Illustrator (or spend $20 per month to use it) there is also a way to isolate the individual images in Silhouette Studio without having to use Adobe Illustrator, and this is done by using the Trace and Detach feature.
Before following this tutorial, you'll need to download the free Easter cartoons image file using the link above. Please note that I do not own the image file pictured above, and the images contained in the file are for personal use only. You may not distribute the file or any of the images contained in the file in any digital format.
Silhouette Trace & Detach Tutorial
| 1. | Go to Open > File and open the 1.ai file from the easter-cartoon-vector-clipart folder. You MUST use the 1.ai file — DO NOT use the 1.svg file or 1.eps file. |
| 2. | Go to File > Page Setup and set your virtual mat to Letter Sized. |
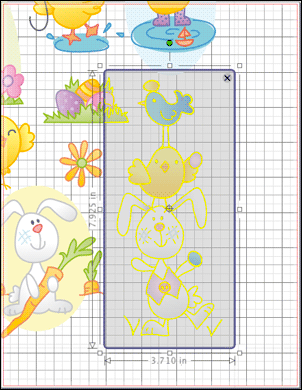
| 3. | Make sure the illustration set is selected and go to Object > Transform > Scale Options... to open the Scale menu on the right. Set the percentage to 175% and click on Apply. Drag the illustration so that the image in the lower right corner is centered on the virtual mat. |
| 4. | Open the Trace Menu, click on Select Trace Area and draw a box around the image in the lower right corner. Your virtual mat should look similar to what is shown in the image below. |
 |
|
| 5. | Trace the image using the Trace tool. The easiest way to trace this image is to uncheck the High Pass Filter, set the Threshold to 100% and apply the Trace and Detach option. |
| 6. | Click on a section of the illustration set that is away from the area you just traced and delete it by going to Edit > Delete or by using the delete key on your keyboard. The image area that was not part of the area that you traced should now be gone, and your virtual mat should look similar to what is shown in the image below. You can now click on any of the little segments that were traced along with the main image (including the blades of grass near the rabbit's feet) and delete those as well. | 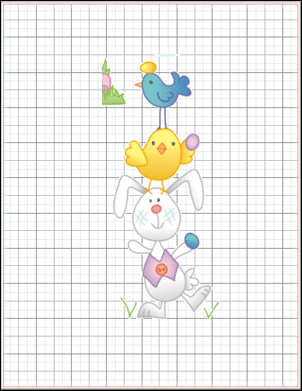 |
| 7. | Open the Trace Menu again, click on Select Trace Area and draw a box around the remaining image. Again, the easiest way to trace this image is to uncheck the High Pass Filter, set the Threshold to 100%. This time, you're going to apply the Trace Outer Edge option. |
| 8. | Click on the image and drag it away from the cut line. Click on the cut line, go to Object > Offset to open the Offset Menu on the right. Click on Offset and set the Offset Distance to .25. Click on the Scissors icon in the top menu to open the Cut Style Window and set the cut to Cut Edge. You will now have a cut line that will leave a 1/4" wide border around the image when it is cut. Close the Cut Style window. Click on the inner trace area and delete it. Drag your image back to the center of the cut line. The image below shows the inner and offset trace lines before the inner line has been deleted. | 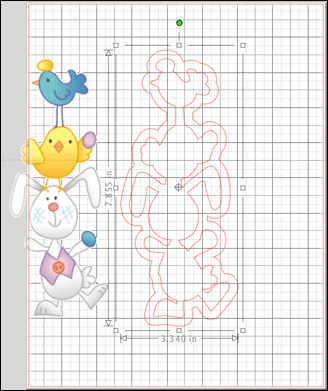 |
| 9. | Go to File > Registration Mark Settings to open the Registration Marks window on the right. Check the Show Reg Marks box. | 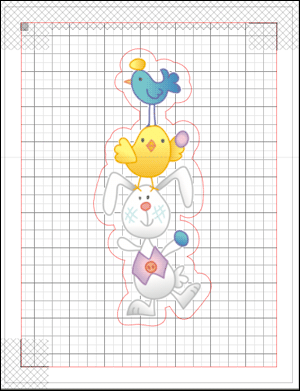 |
| 10. | The image is now ready for printing and cutting. Print your image by going to File > Print and choosing your color printer. The Silhouette registration marks will print in 3 corners of the page. |
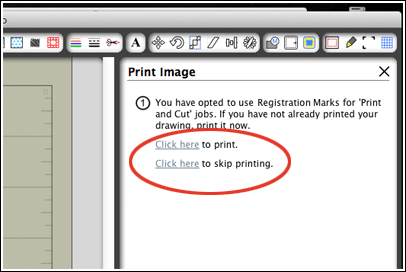
| 11. | Next, choose File > Send to Silhouette. A dialogue will appear asking you if you want to print the job or if you want to skip the printing step. You want to skip printing. |
 |
|
| 12. | Follow the instructions for loading your cutting mat into the Silhouette and click "Continue." |
| 13. | Next, you will be asked if you want to detect registration marks before cutting. Choose "Detect automatically." Your Silhouette will detect the registration marks and, when successful, the software will display a message telling you that the detection was successful. |
| 14. | Click the Cut button and the Silhouette will cut your paper. |
| 15. | You can now print and cut the Easter Card Embellishment files. A pdf file is included for printing, and the cut file is provided in both .svg and .studio formats. See the Silhouette Print & Cut Tutorial if you are not familiar with using the print and cut feature of the Silhouette. Use your pieces to create the Easter card shown at the top of this page, which is made by scoring and folding an 8-1/2" by 11" piece of light blue cardstock folded in half and attaching your print and cut pieces. |
| |
| easter-embellish-cut.studio (left) and easter-embellish-print.pdf (right) | |
| Click here to download Easter Card Embellishment Print and Cut Files | |
The card below was made by tracing and detaching several elements from the Easter cartoons image file, arranging them and applying a white fill to a small offset. The "easter-plaid" digital paper file (download from the digital papers page) was opened and placed into the background, and the entire page was printed from the Silhouette Studio software. The pink print and cut Easter embellishment was then attached to the card.